Exercise: The Key to Relieving Lower Back Pain
14
July
2021

13 workouts for lower back pain
Back pain can be a challenging experience due to its level of intensity that might get in the way of one’s daily life routine. However, there is a myriad of remedies. Exercise is one of them.
Introduction
While some might prefer lying in bed when experiencing pain in their lower backs, movement is medication. Lower back pain is not uncommon, yet it is uncomfortable where almost everyone either had experienced it or will at some point. It can either be a symptom of an underlying medical condition that requires medical attention or due to other factors such as poor posture, aging, sedentary lifestyle, sport-related injuries, or muscle and ligament sprains. Assuming that the cause of the pain isn’t an underlying medical condition, exercising the lower back can strengthen the back, stomach, and leg muscles. It also supports the spine and increases the blood flow to the lower back area, which can help in reducing stiffness and speeding up the healing process. Thirteen helpful exercises will be presented and explained, all of which can be done from the comfort of one’s home with minimal or zero equipment.
Exercises
It is essential to consult a doctor before engaging in any of the below exercises as some might cause more harm depending on the cause and intensity of the pain. For instance, standing toe touches should be avoided at all costs since they exert more pressure on the spine’s discs and ligaments and overstretch the lower back’s muscles and hamstrings. It is normal to feel a slight discomfort at the start of the exercises, but it will subside with the strengthening of the muscles. However, when the pain intensifies beyond being mild in nature, immediately stop and contact a doctor. As a final reminder, be sure to breathe throughout the exercises!
1- Partial Crunches
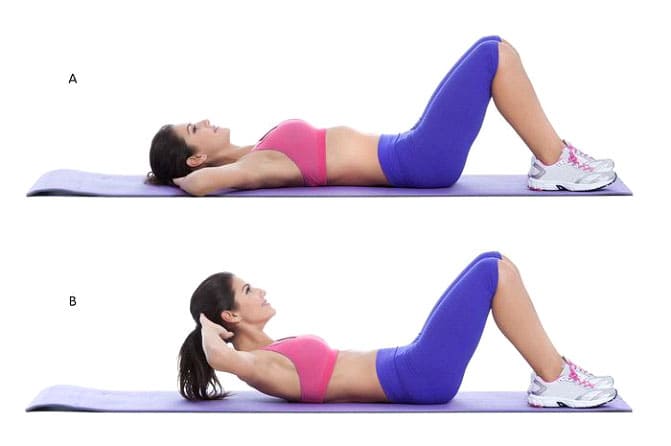
Partial crunches help in strengthening the back and stomach muscles. Strong abdominal muscles play a vital role in supporting the spine and keeping the hips properly aligned. On the other hand, weak abdominals can result in poor core strength and lack of stability which can cause lower back pain.
To do partial crunches, follow the following steps:
Lie back on the floor and bend your knees while keeping your feet flat and hip-width apart (A).
Your feet, tailbone, and lower back should contact the mat throughout the whole exercise.
Cross your hands over your chest, or place them behind your neck.
Breathe in deeply.
Tighten your stomach’s muscle.
Breath out while gently raising your head and shoulders by approximately 2 inches off the ground. Your neck must stay aligned with the spine (B).
Hold for a second, return to the starting position and repeat it 8 to 12 times.
Never lead with your elbows nor use your arms to pull your neck off the floor.
2- Hamstring Stretches
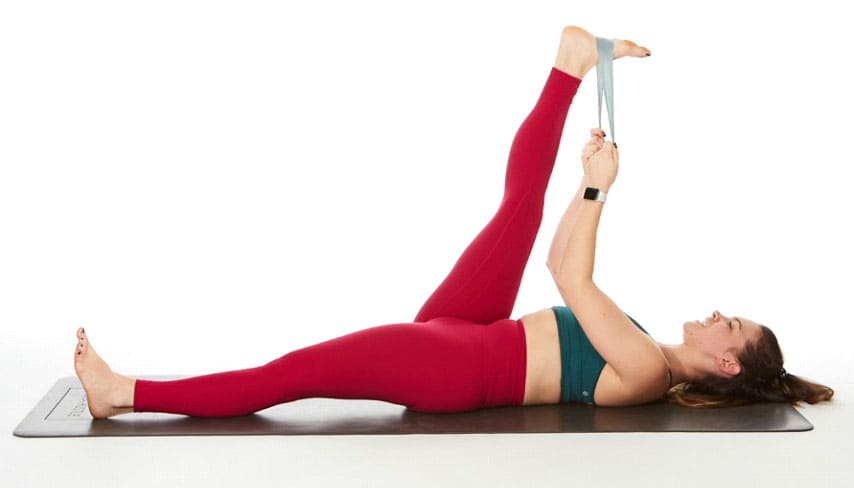
Tight hamstring muscles are found to be a common contributor to lower back pain. Given that hamstring muscles run through the back of each thigh from the hip down to the back of the knee, stretching the hamstrings can gradually lengthen and reduce the tension in the hamstring muscles. This, in turn, reduces lower back pain.
To do a hamstring stretch, follow the following steps:
Lie on your back and bend one knee.
Loop a towel or a resistance band under the ball of your foot.
Straighten your knee and slowly pull back on the towel.
You should feel a gentle stretch down the back of your leg.
Hold for at least 15 to 30 seconds. Repeat each leg 2 to 4 times.
3- Wall Sits
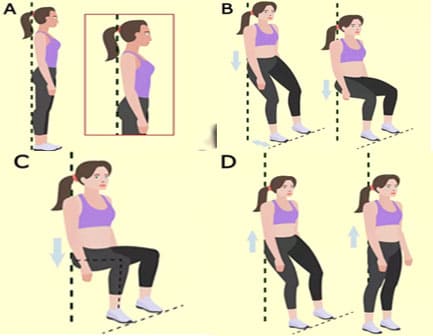
Wall sits strengthen the entire lower body by working on glutes, hamstrings, and quads. Similar to hamstring stretches, wall sits reduce pressure and stress of the lower back. It also increases muscle endurance which is one of the main things people suffering from lower back pain must work on.
Follow the following steps to ace a wall sit:
-
Stand 10 to 12 inches away from the wall (A).
-
Then, lean back until your back is flat against the wall (A).
-
Slowly slide down until your knees are slightly bent, and press your lower back into the wall (B).
-
Hold for 20-30 seconds (C).
-
Then, carefully slide back up the wall (D) before sliding down for another slide (B).
-
Repeat 8 to 12 times.
4- Press-Up Back Extensions (Sphinx Stretch)
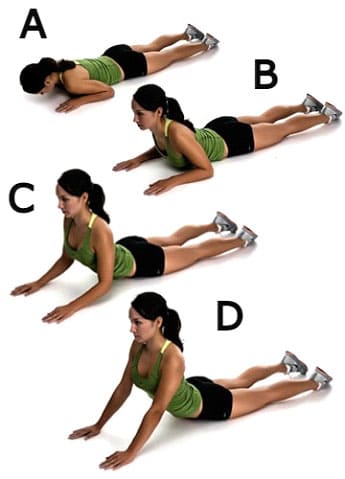
In addition to working the muscles in the butt, hips, and shoulder, back extensions can strengthen the lower back muscles, relieving pain since lower back pain arises due to weak low back muscles.
For a correct press-up back extension, follow the below steps:
Lie on your stomach with your hands under your shoulders (A).
Slowly raise your upper body with your hands, but keep your pelvis glued flatly to the floor. At this point, your shoulders should begin to lift off the floor (B).
Try to create an arch with your lower back, and work up to the Sphinx position until your forearms contact the floor (C). However, if you feel discomfort with your elbows being off the floor, place them on the floor directly under your shoulders.
Hold for at least 10 seconds, and repeat.
With time and as your flexibility increases, you may reach the Sphinx position with straight arms (D).
5- Bird Dog
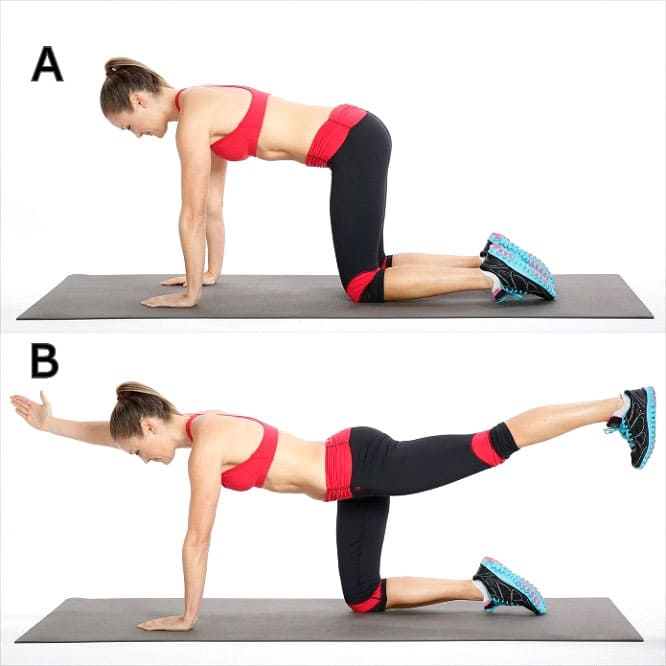
This is considered a simple core exercise that improves stability, encourages a neutral spine, and soothes low back pain. It also strengthens the core, hips, and back muscles and promotes a proper posture. The Bird Dog exercise is suitable for people of all ages. It can be used to prevent injuries, align the spine and recover from low back pain.
For this exercise, follow the below steps:
Start on all fours with your knees placed under your hips and your hands under your shoulders (A).
Maintain a neutral spine by engaging your abdominal muscles.
Draw your shoulder blades together.
Tuck your chin downwards into your chest.
Raise your right arm and left leg while keeping your shoulders and hips parallel to the floor (B).
Hold this position for a few seconds before returning to the starting position.
Alternate between your arms and legs with each repetition.
Do 2-3 sets of 8-12 repetitions.
The pain is persisting for more than 4 days.
It is interfering with your mundane activities and tasks.
It keeps on recurring.
Rectal bleeding
6- Knee to Chest
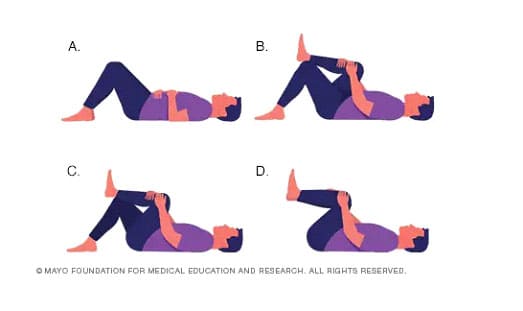
The knee to chest stretch stretches the hip and lumbar spine (lower back) muscles. It also helps relieve pressure off the spinal nerves by creating more space for them to exit the spine.
To do a knee to chest stretch, follow the below steps:
Lie on your back with your knees bent and your feet flat on the floor (A).
Use both hands to pull one knee towards the chest with the other bent on the floor (B).
Hold your knee against your chest for 5 seconds while keeping the abdominals tight, and the spine pressed into the floor (C).
Return to the starting position (A).
Repeat with the opposite leg.
Return to the starting position and then repeat with both legs pulled towards your chest (D).
Repeat each stretch 2-3 times, at least one in the morning and the second at night.
7- Pelvic Tilts
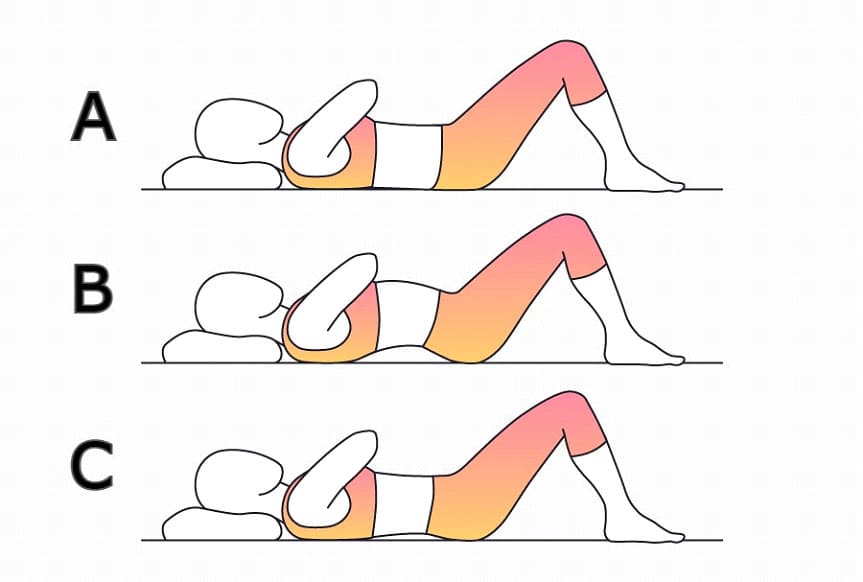
Pelvic tilts work on strengthening the abdominal muscles that help soothe lower back pain and relieve tightness.
To perfect a pelvic tilt:
Lie back on the floor with your knees bent and your feet flat (A). Lay your arms on the sides.
The back of your head should touch the floor, and your neck aligned with your spine.
Gently arch your lower back upwards, and push your stomach out (B).
Hold for 5 seconds, then relax.
Return to the resting position by flattening your back and pulling your stomach towards the floor.
Repeat 5 to 10 times.
Increase the number of repetitions daily, reaching 30 per day.
8- Bridge
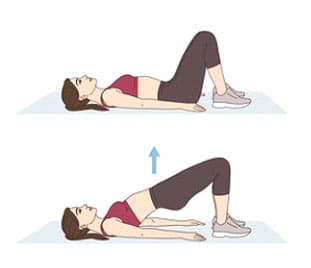
The bridge is a multi-joint movement. It engages the back, hip, abdomen, hamstrings, and gluteus maximus (the large muscle of the buttocks).
To do a bridge, follow the below steps:
Lie on the ground, bend your knees and place your feet flat on the floor (hip-width apart).
Push your heels into the floor, squeeze your buttocks, and lift your hips off the floor until your shoulders, hips, and knees form a straight line. Hold for around 6 seconds.
Slowly lower your body to the ground, and rest for a few seconds.
Repeat 15 times, and then rest for 1 minute.
Avoid: (1) arching your lower back while moving your hips upwards. (2) overarching by tightening your abdominal muscles before and throughout the lift.
9- Child’s Pose
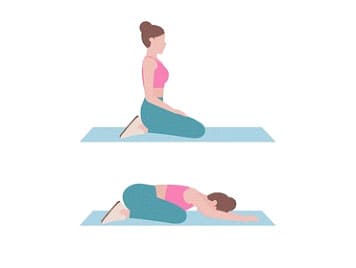
A traditional yoga pose that gently stretches the gluteus maximus, thigh muscles, and spinal extensors. It relieves pain and tension along the spine, neck, and shoulders. It also promotes blood circulation along the spine.
To do a Child’s Pose, follow these steps:
Place your hands and knees on the ground.
Hinge at your hips as you fold forwards with your arms extended in front of or alongside your body.
Rest your belly on your thighs.
Focus on breathing deeply and relaxing any tensed areas.
Hold this pose for 1 minute.
10- Lower Back Rotational Stretches
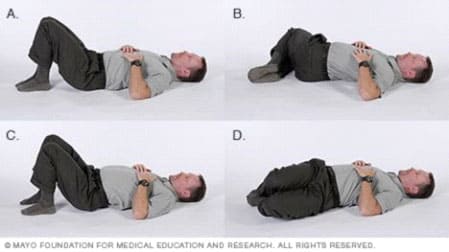
This exercise can help ease tension in the lower back and trunk. It also gently works the core muscles to improve stability.
To perform the lower back rotational stretch:
Lie back on the floor with your knees bent and feet lying flat on the ground.
Keeping your shoulders firmly placed on the floor.
Gently roll both bent knees over to one side.
Hold the position for 5–10 seconds.
Return to the starting position.
Gently roll the bent knees over to the opposite side, hold, and return to the starting position.
11- Trunk Rotations
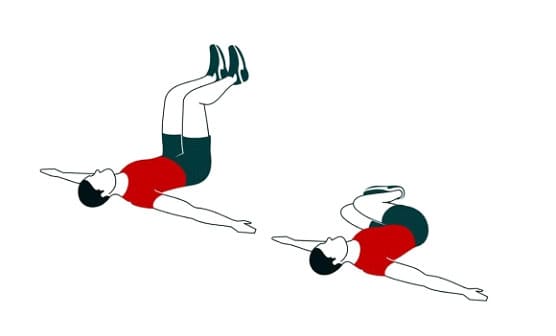
Trunk rotations have the same purpose as lower back rotations. However, it only differs with the leg position where the knees are bent and pulled upwards rather than lying on the floor.
12- Lying Lateral Leg Lift
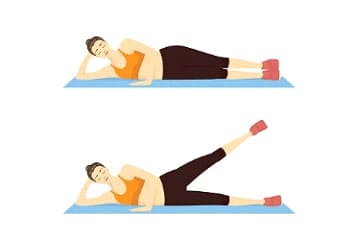
Lying lateral leg raises work the hip abductor muscles that support the pelvis and help reduce strain on the back.
To do lying lateral leg lifts:
Lie down on the right side.
Your body should form a straight line with your legs extended and feet stacked on top of each other.
Place your right arm straight on the floor under your head, bend your elbow, and cradle your head for support. You can also place the left hand out front for extra support, or rest is against your leg or hip.
As you exhale, gently raise your left leg off the lower leg. Once you feel the muscles flex in your lower back (obliques), stop raising your leg.
Inhale, then lower your leg back down to the starting position.
Repeat 10-12 times, then switch to the other side.
The Cat-Cow Stretch
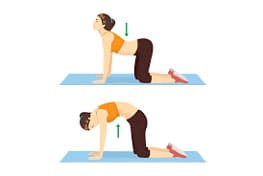
The cat-cow stretch increases flexibility and eases tension in the lower back and core muscles.
To do a cat-cow stretch, follow the below steps:
Get onto your hands and knees with your knees hip-width apart (Starting position).
Arch your back by pulling your belly button up towards your spine. Let your head drop downwards.
This is the cat portion of the stretch.
Hold for 5–10 seconds. You should feel a gentle stretch in your lower back.
Return to the starting position.
Raise your head, and let your pelvis fall forward. You’ll feel a curve on your back. This is the cow portion of the stretch.
Hold for 5–10 seconds before returning to the starting position.
Repeat the cat-cow stretch 15–20 times.
Takeaway
Generally speaking, pain is individual-dependent, and so is its remedy. Listen to your body, and be mindful of its limits. Always consult a doctor before diving right into a workout, or eliminate painful exercises through self-monitoring. Finally, incorporating exercise into your daily routine is essential to strengthening core muscles that help resist strain and future injuries.
If you or anyone you know is suffering from pain, call us today on (469) 562 4188 to book an appointment with our expert doctors.